12/09/2013

Frankincense and Myrrh

Copyright©Jim Long 2013
Ever wonder why frankincense and myrrh are associated with Christmas? Just what, exactly is it, and why was it so valuable?
Frankincense, resin from the Bowsellia tree.
Frankincense and myrrh have been used for eons, for incense. Records show it was traded in North Africa and the Arabian Peninsula, where it has grown, for the past 5,000 years. You'll find it still used in Catholic and Episcopal churches around the world. Both resins have a sweet, warm, balsamic fragrance when burned on charcoal or fireplace embers.

Frankincense, as well as myrrh, are the aromatic resins, or solidified sap from trees. It was burned as offerings in the early Hebrew temples and because of the distance it had to travel on the trade routes, was considered almost worth its weight in gold.

But burning frankincense and myrrh as incense (slightly akin to burning stacks of $100 bills today) wasn't the primary use. Both frankincense and myrrh have proven antiseptic and inflammatory properties. They were once considered remedies for everything from leprosy to toothaches, and very helpful in caring for newborn infants because of the antiseptic properties. The ancient Egyptians used great amounts of both resins for use in insect repellents, facial treatments, salves for wounds and sores. They also used myrrh in their embalming practices.
Myrrh "tears', hardened gum resin from the Commiphora tree.
Today, both frankincense and myrrh continue to be used for their healing properties. Both are used in Ayurvedic and traditional Chinese medicines. You'll find myrrh in many toothpastes because it has proven helpful to dental and gum health. There is current research into its use in cancer treatments, Crohn's disease and many other conditions. It is used in salves for healing cuts, burns and injuries and you can easily make your own. We have frankincense and myrrh in the bulk on our Bulk Herbs page.

Frankincense and Myrrh Incense Kit

We also offer a wonderful Frankincense and Myrrh Kit which includes a packet of each gum resin, special easy-light charcoal tablets, a ceramic tile and complete instructions, all boxed in a keepsake wooden treasure chest. Click here to see and order. We ship the day following receipt of your order.
Thank you for stopping by.

12/05/2013

Make a Cooking Wreath

Copyright©Jim Long 2013
Herbs and pruners are all you need to make a wreath.

I wrote about this craft thing I used to do with groups of visitors, back in the 1990s for The Herb Companion magazine. Seems like a lot of herb groups around the country liked the idea and made lots to sell, so I'm reprinting it again here. It's pretty simple, a wreath woven together out of cooking herbs. I used to sell them in little cellophane bags with a couple of recipes attached. To use the wreath, you simply started a pot of soup or stew boiling and about 15 minutes before the end of the cooking, you simply drop the entire wreath into the pot for seasoning. The flavor is delicious!
Step 1
Step 1, pick a long sprig of rosemary. New, this year's growth is best simply because heavier wood is more likely to break than to bend. You can use any of the following to work into your wreath, all with good flavor: Rosemary, Thyme (any variety), Sage, Garlic chives, Chives (leaves and/or flowers), Oregano, Basil, Lavender (flower spikes), Hyssop, Parsley and Lemongrass (even if it's already brown it still have flavor).
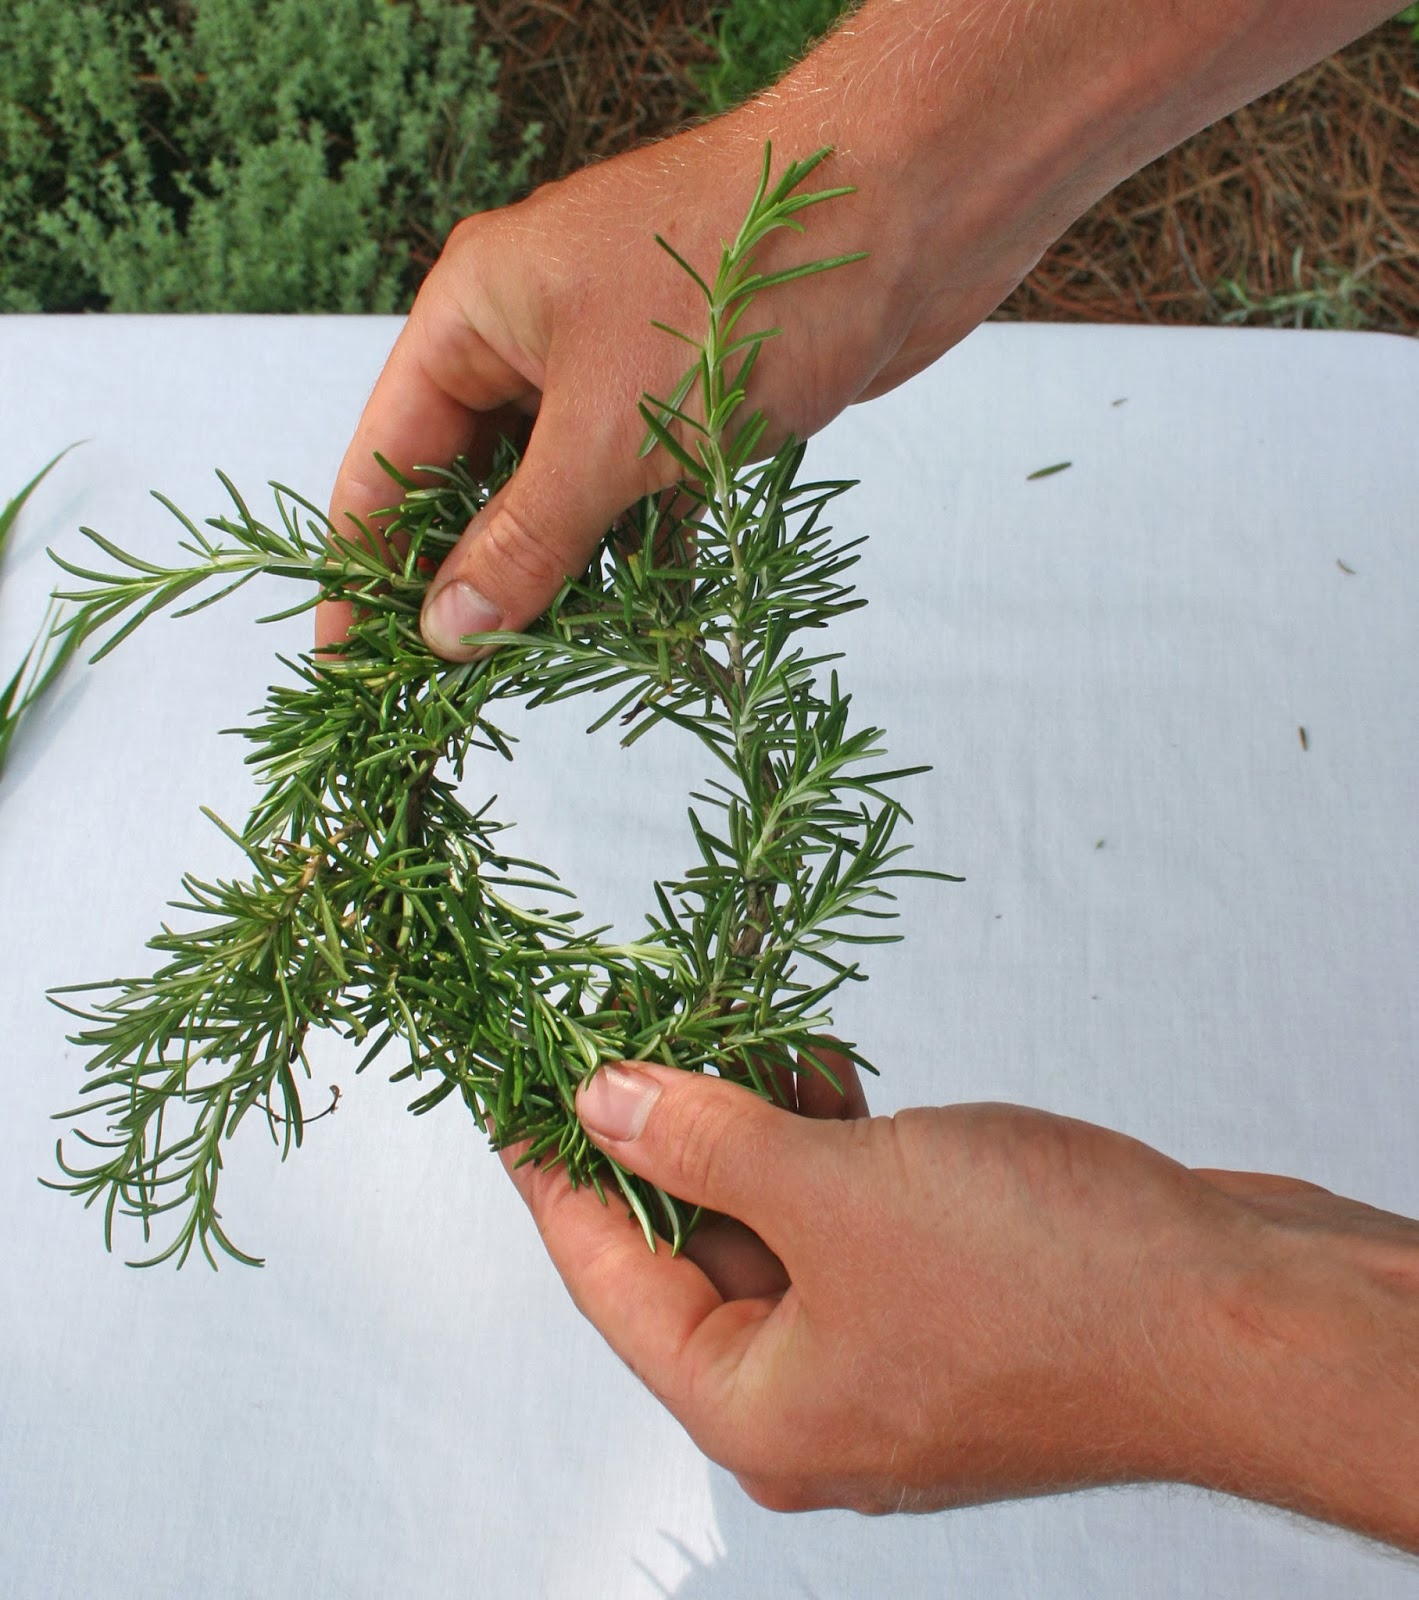
Step 2, bending the sprigs to weave.
To begin your wreath, choose a nice, long sprig of hyssop or rosemary and bend it into a circle, twisting the ends around each other. Hold in place with your thumb and forefinger while you wrap another sprig of a different herb in the other direction (or tie the ends together temporarily with plain white string).

You want to weave each sprig in the opposite direction of the first so they hold each other in place. Don’t get discouraged, it gets easier as you work. (You may want to make several on your first try to get the hang of it).

Step 2, Weave each of the herbs into your wreath, using only the stems and leaves, no string. Tuck ends under and over an earlier sprig and keep adding more. You want to end up with a wreath that is about four inches across, or smaller. Use lemongrass or garlic chives as the last herb, wrapping  it around like a ribbon and tucking each end under another sprig to hold it in place.
Step 3, finishing.
Step 3, When your wreath is finished, trim off any extra ends that are sticking out and put the wreathes in a dark place, like a pantry, on paper and let them dry until crisp.
Attach a string and a recipe if you wish and your cooking wreath is ready to give to a friend.

To use the wreath, remove the string and drop into an already boiling pot of soup or stew. It’s best to add the wreath during the last fifteen or twenty minutes of cooking (this is true of adding any herbs, fresh or dried; add them too soon and the cooking removes the flavors, so add herbs in the last minutes of cooking for the best flavor).
2 finished wreathes; attach a recipe to give as a gift.

Recipes to choose from for attaching to the wreath:

Autumn Herb Wreath Chicken Soup

2 1/2 quarts water
2 chicken breasts
1 stalk celery, diced
1/2 cup diced onion
2 carrots, peeled, sliced
The entire cooking wreath
1/4 teaspoon turmeric
Dash salt and pepper, to taste
*Optional: 1/4 cup brown rice, rinsed

Bring water to a boil and add the chicken and vegetables. Cook until the chicken is tender, about 20 minutes, remove chicken and dice, then add back to the soup. Add the optional rice and reduce heat to a simmer, cooking 10-15 minutes. When you add the rice/pasta, also remove the ribbon from the cooking wreath and add the wreath to the pot of simmering soup. Simmer until rice is done, remove wreath and serve.

Vegetarian Herb Wreath Soup

A vegetarian friend would receive this recipe card attach to their cooking wreath:
2 1/2 quarts water or vegetable broth
Bring water to a boil and add an assortment of your favorite diced vegetables: celery, potato, carrots, a turnip, some cabbage, onion, garlic, 1 slice ginger, etc. about 3 cups total.
*Optional 1/4 cup brown rice, rinsed

Simmer vegetables and rice until tender, about 15-18 minutes. Add the cooking wreath (with the ribbon removed) after 10 minutes of cooking, and continue cooking until rice is tender. Remove the wreath and serve.

Three little cooking wreathes, before ribbons and recipes.


12/02/2013

New Garden Aps for Smartphones


Winter in our garden at Long Creek Herb Farm is generally mild. Our first actual freeze came on Nov. 15, finishing off the last of the hot pepper plants and knocking the leaves off the hardy bananas.
Hardy banana, November.

So much of the garden is put to bed for the winter. Plants, like the bananas, will come back up next spring. And the seed catalogs have started arriving. Have you seen the amazing new Baker Creek Seed Whole Seed Catalog? It's reminiscent of the Whole Earth Catalog of the 1970s. It's 356 pages, filled with not only a more extensive seed assortment than their regular seed catalog, but also information about canning, preserving and lots more. (And an entire page dedicated to Long Creek Herbs and my books! What an honor). Click on the link above if you want a copy of their new catalog.

Baker Creek Catalog, order early before they run out.

Our page in the Whole Seed Catalog
There are some amazing and handy new smartphone aps for gardeners, too. Check out these, below. They're all free aps and easy to download and are good help for the garden.


Leafsnap

Leafsnap, an app created by researchers from Columbia University, University of Maryland and the Smithsonian Insitiution, allows users to take a picture of a leaf then use the app to help identify the species. FREE


Plant Diagnostic Sample Submission

This app allows users to submit digital photos to a university diagnostic lab for identification of plant diseases or pests. FREE 


A smart phone app specifically for rose lovers, Our Rose Garden features information about roses, how to plant and prune them as well as how to overwinter your favorites. Created by the University of Illinois Extension, this app also includes a gallery to track favorite roses and includes several videos about rose care.

Garden Time Planner

This planning tool helps gardeners know when to sow, transplant and expect to harvest vegetables and herbs specific to their region. A recent addition is that the app now includes annual flowers in the database of plant listings. FREE 

11/20/2013

Kale for Thanksgiving


Three kale varieties in the Bear Creek Farm gardens.
Kale is a very healthful greens plant with lots of benefits. It has taken me a good while to actually like kale, but over time I've come to really enjoy this leafy plant. I've been experimenting with new ways to use kale, and my recipe for kale stuffing and kale and pear salad are listed below. We had both last night for supper and I have to admit, both were darned good!

Here's what I served for supper last evening. It's flounder baked with kale and cornbread stuffing. Next to that on the plate is a kale and pear salad.
Flounder baked with kale and cornbread stuffing.
Start with 1/2 cup chopped celery and 1/4 cup chopped onion. I added 1/8 cup of zucchini squash and sauted all of that in 2 tablespoons of olive oil. After about 7 minutes and while still cooking, I added 1 1/2 cups chopped, fresh kale and let that wilt. I added 2 cups of cornbread cubes, some poultry seasoning (sage and thyme) and simmered that until the cornbread cubes had absorbed the liquid. I piled it atop the founder and baked it for 15 minutes at 350 degrees F.

Kale Salad
The kale salad was just as healthy and also quite easy. I used 2 cups of coarsely chopped kale (any variety, all kale is good). I added one fresh pear, cut in pieces, 1/4 cup seedless grapes cut in half, 2 tablespoons toasted sunflower seeds (or raw, both will work fine). The dressing was simply 3 tablespoons of yogurt - I had blackberry yogurt on hand, but any favorite yogurt works. The flavors were great, we had a healthy, filling meal and I'll make this again.

For Thanksgiving I'm going to add both chopped kale and zucchini squash to my stuffing. It cuts down on the carbohydrates, adds good flavor and gives a healthy boost to an otherwise bready stuffing. Click here to see my kale soup recipe (it's actually not mine, I learned it from Jim & Robbins Hail at Bear Creek Farm). It is outstanding and really easy, too. Here's kale to your good health.
Happy Thanksgiving!

Oh, and if you want the best pumpkin pie recipe, and our special seasoning, click here. Anne's Pumpkin Pie Seasoning is the best flavored seasoning we've ever found, and Anne gave us her very special pumpkin pie recipe - much better than that recipe on the side of the pumpkin pie can!

11/11/2013

Elephant Garlic


A single head of elephant garlic.
Back in the 1980s, on a cold day in January I was preparing for the arrival of a newspaper reporter. She was coming to interview me about what was in the garden that month. When she had called a week earlier, she said she was looking for a garden story idea but assumed there was nothing still in the ground and maybe we could do a story on soil preparation. I explained that with our mild Ozarks winters, that yes, I did still have food growing in my garden. Carrots and leeks were still in the ground, lettuce, peas and spinach were growing in a cold frame. As is my custom when reporters come, I invited her for lunch, to taste a bit of the garden.

Elephant Pie

That day we dug carrots and picked lettuce and spinach for her photos. Those went into a salad, which I served with Elephant Pie. Elephant Garlic Pie, that is. I like elephant garlic as a vegetable, it has a mild, sweet flavor that works well in all sorts of dishes. Even steamed and buttered, it's delicious.

Elephant garlic, you may not know, was first introduced to the gardening world by Nichols Garden Nursery in 1941. (Someone later gave Luther Burbank credit, but the documentation is clear, the first elephant garlic, along with the name, started with Nichols Garden Nursery in Albany, Oregon.

Areas of the famous Willamette Valley, known for its mild climate and amazingly fertile soil, was settled partly by immigrants from Czechoslovakia and Northern Yugoslavia. Mr. Nichols discovered that some of these folks were growing an enormous variety of garlic, mild in flavor and vastly different from any garlic he had ever seen. They had brought this unusual garlic with them from the Old Country. He purchased 12 pounds as seed stock in 1941 and began cultivating it. When he finally had enough to sell, he began advertising in newspapers and magazines. In 1953 he gave it the name, elephant garlic. Back then, he was the only one selling it and when you ordered elephant garlic from Nichols, in your order you received a little pamphlet with growing and storing instructions. He sold elephant garlic across the U.S., Canada and to many countries overseas.
The original pamphlet that accompanied orders, in 1953
I just planted my elephant garlic this past week from some I ordered from Nichols. I prefer to plant it in September, but things were too busy this year. I've actually planted it as late as the first of December and it has done well, thanks to our fairly mild winters here. Next summer, probably about mid-June, my elephant garlic will be ready to dig. You can still order some for planting from Nichols. I've seen it in the produce department of several grocery stores if you want to get some to cook, but to get a start to grow, of the original, authentic elephant garlic, order from Nichols. (Every other nursery or seed company that sells elephant garlic, can trace their original sources back to Nichols). Here's my Elephant Garlic Pie recipe. It's like a quiche and you can add a regular pie crust if you wish, but I usually make mine crust-less because it cuts down a bit on the carbohydrates and fat.

Elephant Garlic Pie
5-6 cloves elephant garlic, sliced
1 tablespoon butter or olive oil
4 eggs
1 can evaporated milk
1/2 cup shredded cheddar cheese
1 cup chopped fresh spinach
1 cup diced, thinly-sliced ham (leave it out if you don't eat meat)
1 tablespoon cooking sherry
1/4 teaspoon any brand hot sauce
2 green onions, diced
Salt and pepper to taste
  1. Preheat oven to 350 degrees F.
  2. Saute the sliced elephant garlic in olive oil or butter until tender, about 5 minutes.
  3. Beat the eggs and milk together; add the cooking sherry, hot sauce, green onions and salt and pepper. 
  4. In a oiled pie plate, layer the garlic, cheese, spinach and ham, then pour the egg mixture over. Dust with a bit of paprika if desired.
  5. Bake until a knife inserted comes out clean, about 35-40 minutes. Let set for 5 minutes before serving.
Nichols Garden Nursery also is the source of my favorite sour dough starter. Mr. Nichols got the start in the late 1940s from a friend who'd been a logger in Alaska. They sell it in powdered form and you mix it with your own bread flour and get it started. We make 2 loaves of sourdough bread a week here at the farm. Sourdough bread is considerably easier for diabetics to eat and Nichols' starter is the best tasting I've ever had. (I don't care for the San Francisco sourdough breads, they're too, well, sour, for me, but Nichols' Oregon Pioneer starter tastes lots better). Here are a couple of recent loaves of sourdough bread we've made.


Freshly-baked sourdough bread is simply delicious!

10/31/2013

Squash Frittata, Beet Cake

Dennis, Betty, Josh and Art (checking  his email).
A newspaper editor came to the garden this summer for an interview. He asked me why I garden. "You've been doing this every year for most of your life, so don't you get tired of doing the same thing over and over?" I tried to explain no two seasons are ever the same, every year is a new challenge and every year I try new varieties, different vegetables and herbs. Not being a gardener, I don't think he ever quite understood. But the primary reason I garden is what you see above, getting to share what I grow and produce with good friends over pleasant meals. These folks are all friends from Hawaii, we always look forward to their visits and they love good food, so cooking from the garden is always a pleasure.
Fresh from the garden, directly to the kitchen.
Betty especially likes beets, fixed any way they can be fixed, so we had steamed beet greens with balsamic vinegar, buttered beets with orange juice and a beet cake (along with grilled salmon, and a squash fritta).

Frittata, grilled salmon, beet greens and beets.

Here's the frittata recipe.

Squash Frittata
  • 3 tablespoons olive oil
  • 1/2 teaspoon grated fresh ginger
  • 1 small yellow onion, thinly sliced
  • 2 cloves garlic, chopped
  • 1/2 teaspoon ground turmeric
  • 2-3 medium zucchini (or young patty pan squash), in 1/4 inch slices
  • 2 tablespoons flour
  • 1/4 teaspoon baking soda
  • 4 eggs, beaten

Preheat oven to 375 degrees F.
Heat oil in a saucepan. Add onion and garlic and saute until soft. Add turmeric and zucchini, add a dash of salt and pepper and cook until tender, about 10 minutes. Stir in flour and baking soda and cool briefly.
Mix in the beaten eggs with the zucchini and pour into a greased 9" x 13" casserole pan and bake until set, about 25 minutes. Let cool for 5 minutes before cutting into serving sizes.
Apple pie - how did the crust get that way??

Beet cake. A leaf and powdered sugar created the design on the cake.
 For dessert we had either beet cake or apple pie so of course everyone had a small piece of each one. Here's the beet cake recipe, not mine, I was given the recipe by herb friends at Round Top, TX and I've made some adjustments to it over the years.

Beet Cake

  • 1 15 oz. can of beets (not pickled, just plain, canned beets)
  • 1 1/2 cups flour (I use 1 cup unbleached flour and 1/2 cup whole wheat flour)
  • 2/3 cup vegetable oil
  • 3 eggs, beaten
  • 2 cups sugar (I use 1 1/2 cups granulated stevia or Truvia and 1/2 cup sugar)
  • 2 teaspoons cinnamon
  • 2 teaspoons dry ginger
  • 2 tablespoons freshly grated fresh ginger
  • 2 teaspoons baking soda
  • 1/2 teaspoon salt
  • 1 cup nuts, chopped (I used pecans or walnuts)
  • 3/4 cup coconut

Heat oven to 350 degrees F.
In a food processor, empty the entire can of beets, juice and all. Blend it well. Combine the rest of the ingredients except for the chopped nuts, mixing well. Fold in the chopped nuts and coconut. Pour into a 9 x 13, oiled and floured baking pan (or 2 round cake pans). Bake until a knife inserted comes out clean, about 25-30 minutes. Let cool. Serve with real whipped cream. Or, if using 2 round cake pans, use this filling between the layers:


Cream Cheese Filling
  • 1 (3 ounce) package cream cheese, softened
  • 1/3 cup butter, softened
  • 4 cups powdered sugar
  • 1 teaspoon vanilla extract
  • 2 tablespoons milk

In a medium bowl, blend the cream cheese, butter. Gradually mix in the powdered sugar, vanilla and milk, mixing well. Spread on bottom layer of cake, then add the top layer. Let set up for an hour or so before serving. The cake can be made ahead and frozen, then thawed before serving.

Beet cake doesn't need frosting, just some real whipped cream on top.


10/25/2013

Composting Simplified

It's always a bit confusing to me when people tell me they don't compost because it's too complicated. My mother used to compost regularly, back in the 1950s and '60s. All she dig was dig a hole in the ground next to the raspberry patch. It wasn't a big hole, just 18 inches across and about that deep. Every day when she had coffee grounds, vegetable scraps, potato peelings and egg shells, they'd go into the compost. About once a week she'd add a bit of soil and mix it in. When the compost pit got full, she'd dig another one and let the first one rot. She might turn the rotting compost a bit and by the next season she had rich, black compost that she used in her potted plants and garden. If she had this great kitchen appliance, her composting would have been even easier, because the smaller the pieces you put into the compost pile, the quicker it decomposes.

The Green Cycler is a handy addition to your composting. No cords to worry with, it's easy to turn the hand crank and chop the kitchen scraps so they'll compost faster. Green Cycler is available here and cost around $95 and will last for years.
The Green Cycler, a hand-cranked, kitchen scrap chopper.
Of course you don't put meat or food scraps in the compost, otherwise you'll attract the neighbor's dogs, cats, wildlife, all wanting to dig into the compost for tasty scraps. But egg shells, chopped vegetable scraps, watermelon rinds and carrot peelings, all go into your compost.
The drawer holds the chopped vegetables until you're ready to add to the compost.
It's a nifty idea, you put in the scraps, turn the handle and everything goes into the holding drawer. No smell, no mess, and when it's full, you simply pull out the drawer by the handle and carry it to the compost pile.
You can even compost directly into your flower bed if you don't have a compost spot. You might even add the scraps to a spot in the flower or vegetable garden, and every month, move a few few away and start a new one. In no time you'll have rich, soil with lots of nutrients for next year's growing season.


My compost bins.
Above are one of my composting areas at Long Creek Herb Farm. Weeds pulled from the raised beds, vegetable scraps, coffee grounds and things like squash, damaged tomatoes, etc., all go into the compost. It gets turned 2 or 3 times a year, one side is always the older, almost-ready compost and the other side is the newest. The next photo, below, is the compost bins at my favorite restaurant, The HerbFarm in Woodinville, WA. They grow their own organic produce in their own gardens and all of the vegetable excess from the kitchen goes into the compost.
One of several compost bins at The HerbFarm Restaurant.
My old friend, Felder Rushing, says there's no mystery to composting. "You just pile stuff up and let it rot." You can make it complicated or simple but it's a great way to recycle food scraps that would otherwise go into landfills. Happy composting!

10/17/2013

Lavender Wands

Lavender in bloom.
Lavender wands are an odd craft. They're not really very functional other than scenting a drawer, or adding fragrance to clothing. Yet as an object of art, they are highly desirable. Each one is different, each one is an expression of creativity and dedication by the one who creates them. I once spent an entire summer, 1984, making lavender wands while recuperating from a bad back injury. I had a bountiful lavender crop that year and since lavender helps lift the spirits, it was a useful activity from which I learned a great deal.

While I was at the International Herb Association conference in Townsend, TN this summer, I photographed my long time friend, Pat Kenny, as she made lavender wands. She's an amazing artist, so creative that everything she touches seems to become a piece of art. So here's the process for making a lavender wand.

Begin by tying together about 17 or 19 lavender spikes.
You always begin with an odd number of lavender stems, otherwise the weaving won't come out right. I use 17 but some will use 19 or 21 stems. Tie the stems together at the base of the flowers with a ribbon. Don't cut off the ribbon, that's what you will be using to weave the wand.
Then bend over the stems and you're ready to weave.
Showing bending the stems as you begin to weave in and out.
Pat changes ribbon as she goes, creating ever more interesting patterns and designs. She simply tucks in a new piece of ribbon and makes sure the end is secure, then continues weaving under and over the stems.
Here's Pat Kenny with one of her wonderful lavender wands.
Look at these (you can even click on the photo to make it larger). Very different ribbons, varying designs, all works of art. Pat's lavender wands are amazing. I have one she made and treasure it because it's beautiful, deliciously scented, but more because it's from my friend.
The ones I've made tend to be simpler, like the one above. Sometimes I've added lemon balm inside for added bulk and fragrance. Below is one I made for Hillary Clinton in 1985 when she dedicated the Heritage Herb Garden in Mountain View, Arkansas. I made it from the first lavender grown in the garden there. Funny now, we were so young!
Hillary Clinton, holding one of the first lavender wands I made.
Lavender is one of the most soothing, relaxing herbs you can grow. It's used in cooking, bath blends, potpourri, medicine, sleep pillows and many other ways, but a great way to preserve its soothing fragrance is in a lavender wand. Thank you, Pat, for sharing your methods for making your artful wands!

10/09/2013

Our Summer Interns

Overhead view of part of our garden.
A passion for plants can have unintended consequences. For example, I've been fortunate to live on the this wonderful farm for 34 years. During that time I have improved, expanded and embellished the garden. I've built raised beds, put in gravel pathways, added a gazebo and arbors, and added tons of compost. All of that in order to keep planting new, rare, unusual and fun plants.

For example, I was among the first to grow and blog about ghost peppers, 6 years ago. I was growing green pepper basil and achocha before anyone for many states around even knew what those plants were. I've grown the remarkable Dancing Tea Plant, curry tree, green pea eggplant and Dragon's Claw millet, all out of a passion for seeing and tasting new plants. Over time my love for new plants has grown beyond the bounds of what  I can manage. There aren't enough hours in the day to grow, till, weed, photograph and write about all of my plant experiments. So more than a decade ago, we have been hosting interns to help out with the garden.

Over the years we've had a wonderful variety of interns come to our garden. We worked first with a non-governmental organization which provided interns for 9 month stretches. Eventually we changed to working through the WWOOF organization (Willing Workers on Organic Farms). It's a world-wide organization and gives wonderful opportunities for those wanting to learn about a variety of farming or gardening techniques. This garden year we've hosted 2 WWOOFers, each for 6 week periods.
Anthony

Anthony came to us from Pennsylvania in early April after working on a farm in Virginia. He arrived just in time to help with the garden clean-up, tilling and bed preparation. He had not planted a garden before so learning about seed depth and spacing were his first lessons.

He's also an adventurous cook and lover of hot sauces, so while he was here, he worked with me in the kitchen, learning to make homemade crackers and hot sauces. Because of his background of working in a pizza place, he had a feel for working with flour and within a few days, had perfected crackers, making more beautiful and crispy crackers than I had in the past. (Recipes from my book, Easy Homemade Crackers Using Herbs).

A few of Anthony's crispy crackers.
Anthony left us in mid-June right after our annual garden open house and headed for Las Vegas, NM, where he worked on a farm until the fall. He stopped to visit us for a day and night on his way back to Pennsylvania where he will work the winter then return to WWOOFing on farms next summer.

Our next intern who also  quickly became a good friend, is Charles. We were his first WWOOFing farm and he was eager to learn every aspect of farm life. He took over the daily chores with the goats and chickens and learned the process of making goat cheese and yogurt.
Charles

Charles also had a love for hot sauce and since we're growing 40 varieties of hot peppers this year, I quickly put him to work learning how to make and can hot sauce (recipes from my newest book, Make Your Own Hot Sauce). We also canned tomatoes, something he'd not done before. Josh taught him about sourdough bread making and Charles quickly learned that, as well.

Charles is a vegetarian, not because he dislikes meat, but because he really likes vegetables, so I took on the challenge of learning to be a better vegetarian cook. Our interns fix some of their own meals in the guesthouse kitchen, but lots of our meals are combined, especially at dinner time. I really enjoyed learning new recipes and finding ways to have balanced-protein meals without meat. I was surprised that I didn't crave meat and went much of the 6 weeks Charles was here, eating no meat.

Charles playing guitar and singing.
Charles has an excellent singing voice and entertained us several evenings with singing and playing the guitar. He and Anthony had both been in bands and they got to meet when Anthony made his stop-over on his way home.
Josh, Charles and Anthony, discussing the affairs of the world.
So, even though our garden has grown far beyond what I can take care of myself, it has opened up opportunities for interns to come and learn from me. I feel very fortunate to have these amazing young people (not all young, either, WWOOFers can be of any age) come to stay with us, learn about cooking with herbs, planting vegetables, tending animals and cooking good food.

Almost without exception, the interns we've had over the past 10 or 12 years, have been passionate about food, eager to grow their own, thirsty for knowledge and willing to share what they know, as well. I admire them for their willingness to take risks, do new and interesting things and discover what they want to do in life. I feel as if I learn more than they do, each one bringing something new and interesting with them. Here are a few more of our interns from previous years.
Kristin
Paul the pie man
Adam, who has been back 3 times working.
Yakof Smirnoff, with intern, Gabe
Seth, who came by bicycle, and mastered cracker making, too.

Each person who came as strangers, left as friends. Each has contributed their talents and ideas and made our lives better by their sharing journey of discovery with us. I feel so very fortunate to have the opportunity to know and learn from each person who comes to our garden.